| Availability: | |
|---|---|


Product Description
Specification for endo cutter stapler | |
Product Name | Disposable Endoscopic Cutting Stapler |
Specifications | 1 stapler + 1 cartridge(reload) |
Package | 1pc/box |
Packing Info | 1pc/box, 10pcs/carton |
FESHIN is Endoscopic Linear Cutter Stapler manufacturer & supplier & factory
When using endoscopic linear stapler the moving body slides in the two support plates through the moving body, so that the tissue can be adjusted to the optimal suture position between the end face of the reload and the staple-receiving seat, so that the tissue is in a fixed position, and then it can be fired. The safety block plays a role in preventing accidental firing. Endoscopic linear cutter stapler and reload are composed of the rear connecting shaft (lock sleeve), knob, rotary head, fixed handle, reset handle, movable handle, firing handle, insurance button, etc.; the reload includes a staple box, a staple hold, cutting knife, staples and front connecting rod. Stapler and reload are used together. In the same operation, the stapler can be equipped with 8 staple reloads and fired 8 times. The reload are individually packaged.


| Intracavity cutting nail cartridge assembly nail height code of anastomosis table | Nail height | Limit deviation | ||
| Inside row | Middle row | Outside row | ||
| A | 4.8 | 4.8 | 4.8 | ±0.2 |
| B | 3.5 | 3.5 | 3.5 | |
| C | 2.5 | 2.5 | 2.5 | |
| D | 2.0 | 2.0 | 2.0 | |
| E | 42 | 42 | 42 | |
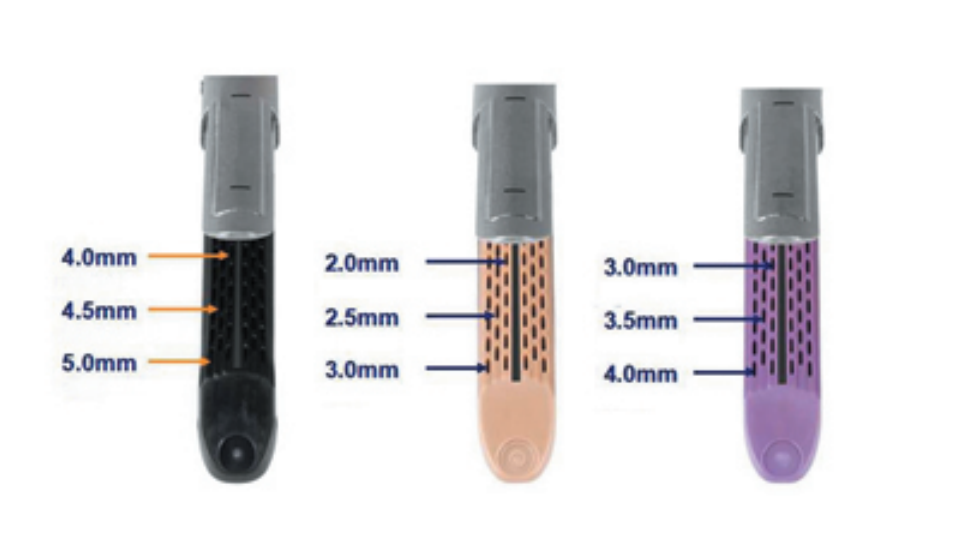
| F | 4.0 | 4.5 | 5.0 | |
| G | 3.0 | 3.5 | 4.0 | |
| H | 2.0 | 2.5 | 3.0 | |
Quantity (Pieces) | 1 - 100 | >100 |
Est. Time(days) | 7 | To be negotiated |
endo cutter stapler is suitable for the resection, transection and anastomosis of tissues in endoscopic surgery of abdominal surgery, gynecology, pediatrics and thoracic surgery.
Model | Connecting Sleeve Length (mm) | |
PNM | 160 | |
Used in abdominal surgery, gynecology, pediatrics and thoracic endoscopy in tissue resection and anastomosis, cross sectional.
| Model | Color of Nai | Suture Length (mm) | Suture Length (mm) | |
| PNDCZ-60B | blue | 3.5 | 60.5 | Z : straight head type |
| PNDCZ-60C | White | 2.5 | ||
| PNDCZ-45A | green | 4.8 | 44.5 | |
| PNDCZ-45B | blue | 3.5 | ||
| PNDCZ-45C | White | 2.5 | ||
| PNDCX-60B | blue | 3.5 | 60.5 | X :swivel type |
| PNDCX-60C | White | 2.5 | ||
| PNDCX-60E | gold | 4.2 | ||
| PNDCX-60F | black | 4.0/4.5/5.0 | ||
| PNDCX-60G | Purple | 3.0/3.5/4.0 | ||
| PNDCX-45A | green | 4.8 | 44.5 | |
| PNDCX-45C | White | 2.5 | ||
| PNDCX-45E | gold | 4.2 | ||
| PNDCX-45F | black | 4.0/4.5/5.0 | ||
| PNDCX-45G | Purple | 3.0/3.5/4.0 |

![]()
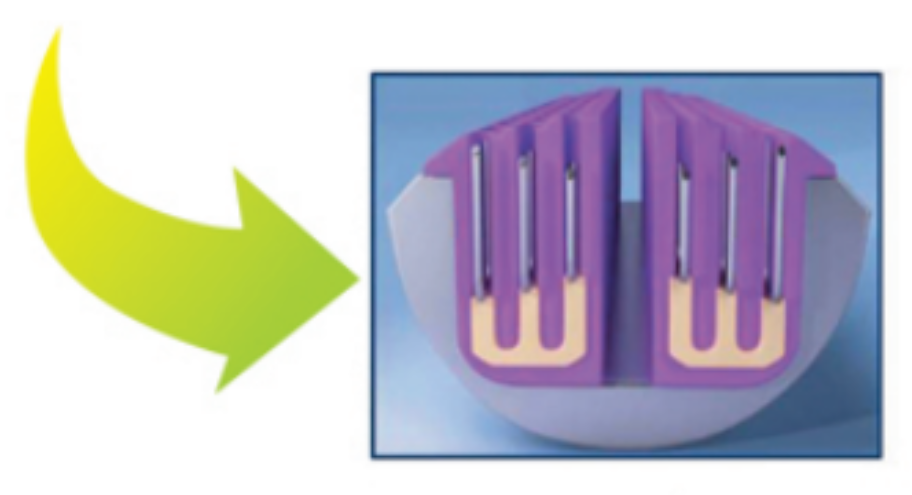
Three rows of different height staples

Open the aseptic package of the stapler body or components and take out the stapler body and components (do not remove the protective cover on the components at this time), and put the “↑” Press down and rotate clockwise, when the marking line on the end of the metal tube of the component is aligned with the "↑" on the head of the stapler and the blue unload button marked "UNLOAD" is reset, indicating that the body and the component are connected In place (At this time, you can turn the component down gently counterclockwise, if you can't turn it, connect it in place).
Note 1: When the components and the body cannot be assembled smoothly, please confirm that the black reset button on the body has been pulled to the bottom of the body, or check whether the protective cover on the module is removed or the protective cover is not snapped in place.
Note 2: When assembling the component and the body, do not remove the protective cover on the component in advance, otherwise the following consequences may occur: ①The component and the body cannot be assembled normally.②The component and the body can be assembled normally, and the operation can be cut normally Suture; however, the cutting knife cannot be reset after the suturing, and the head of the assembly cannot be opened, resulting in the tissue cannot be removed.
2. Remove the protective cover of the component, hold the movable handle, close the head of the component, and use the puncture device to reach the required surgical site Note: If the component and the body are connected, hold the movable handle, the head of the component cannot be closed smoothly, indicating that the component and the body are not connected in place, first install the component protection cover, and then refer to step 6 to remove the component Reassemble. At this time, if you forcibly pinch it hard, the internal rack of the gun body will be broken and the equipment will be scrapped.
3. Pull the black reset button back to open the head of the assembly (if the assembly is rotatable, you can turn the rotary button on the stapler to adjust according to the needs of the operation), so that the tissue that needs to be removed can be placed smoothly Adjust the tissue to be cut between the staple cartridge and the staple seat to make it evenly spread and ensure that no excess tissue is clamped.
4. Grasp the movable handle to clamp the tissue and then loosen the movable handle, press the green safety, and start the operation. Each time you hold the movable handle and cut 15mm forward, (after pressing the green safety to start cutting, it must be cut to the end, not halfway. Pull the black reset button) for the specific cutting position, please refer to the black scale line next to the black reset button on the body (or the black scale line at the lower part of the component).
Note: Remember to press the green insurance before firing, otherwise the rack inside the body will break and the instrument will be scrapped.
5. After the anastomosis and cutting process is completed, pull the black reset button on the actuator back to release the clamped surgical tissue from the head of the staple cartridge. Hold the movable handle again, and after the component head is closed, exit the instrument.
Note: After the cutting is completed, pull the black reset button backwards, do not hold the movable handle, otherwise the black reset button cannot be pulled backwards.
6. Component replacement method: As in surgery, components need to be replaced. First pull the black reset button back to open the head of the component, and then pull the blue unload button on the dial back, turn the component counterclockwise to remove it, and restart it. For the operation of step 1, just install a new component.
7. Component configuration: The stapler body is divided into three types: long handle type (L), standard type (M) and short handle type (S). It is a product for the same operation. Each type of cutting stapler body can be used. With a variety of staple cartridge components, the staple cartridge components are disposable products.